So I finished the Chickadee blouse from Clever Charlotte and it was well received.
Now on to the Chickadee skirt!
Take care cutting out-read the pattern directions-I ended up cutting Tildy's the wrong way but I think she will forgive me.
Cut the interfacing.
I found it just as easy to trace the pieces but remember to trace the right direction!
We want to interface the lining!
Apply the interfacing to the skirt lining.
Matching notches,sew the side seams of the skirt and skirt lining.
Press all the side seams open.
Sew the skirt and skirt lining together leaving a 5' opening at the bottom centre back.
Consider stitching up to the seam allowance at the opening. It will help press the hem nicely.
Trim the seam allowance.
Except for the opening.
Turn the skirt through to the right side.
Roll the edges under your fingers and then press well.
Fold and press the opening.
Following the pattern instructions and using the pattern as a guide position the front wrap on the skirt and pin in place.
The back opening will be sewn in the next step.
Charlotte offers stitching directions in the pattern instructions.
I stitched mine differently as I like to sew with the bulk of my fabric to the left.
Stitch closely to the edge.
Measure a casing for the elastic across the back and sew in place.
Following the instructions unpick the side seams
within the stitched casing.
Sew a button at each end of the casing.
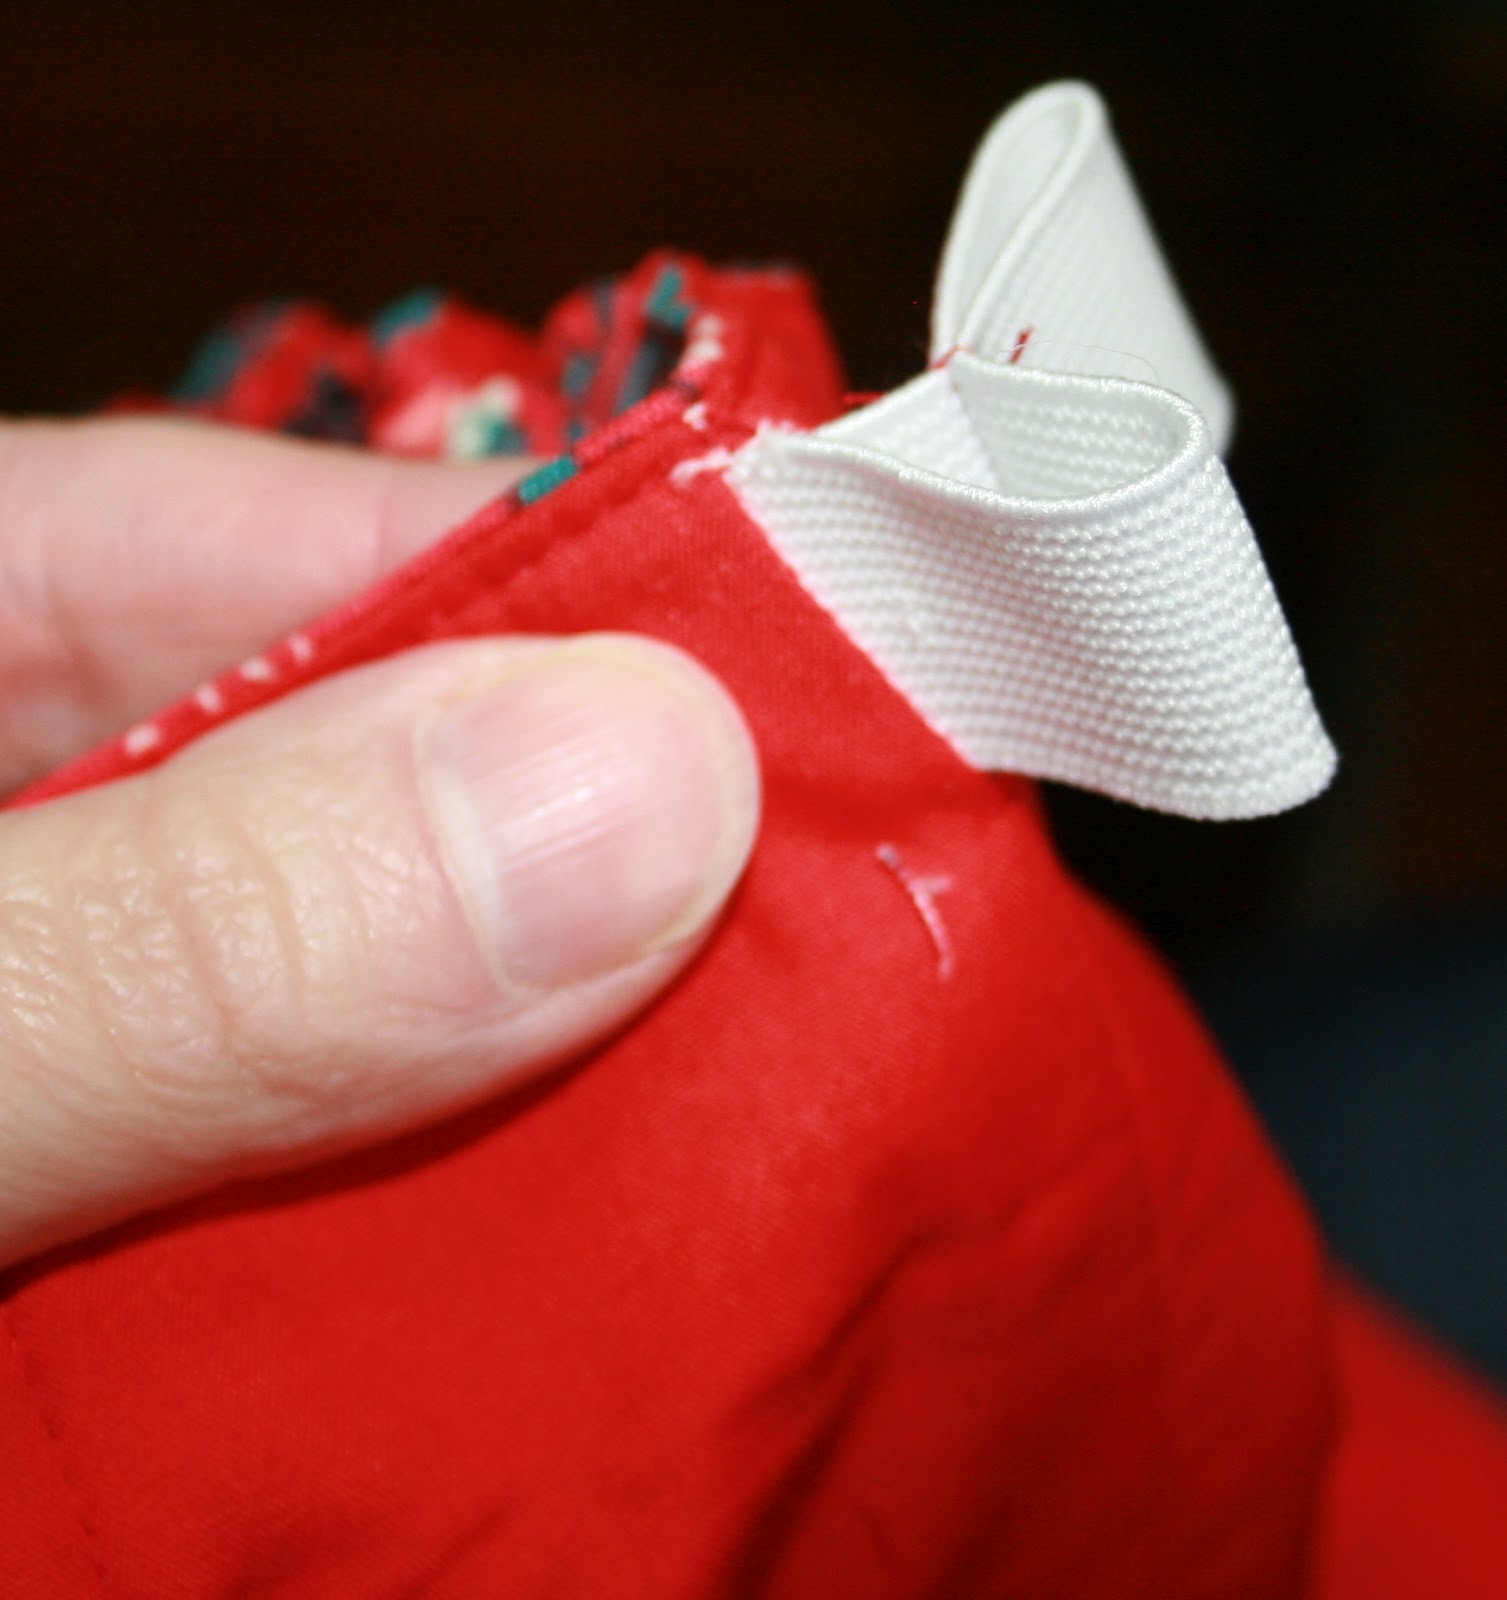
Cut the button hole elastic to size.
Consider stitching the zigzagged end of the elastic(done to prevent fraying)to the skirt to prevent little fingers undoing the button and losing the elastic inside the casing.
Thread the elastic through taking care not to twist it.
Consider stitching the other end of the elastic to the skirt as well.
You know what fiddly fingers are like!
A zipper foot makes it easier.
Liddy thought a big button might be nice.
I thought some hanging ties might be nice.
How cute Chickadee!
Perfect with the blouse Clever Charlotte!
Just in case you don't have any button hole elastic to hand there is another way to keep the back adjustable and allow for growth.
As before,measure and sew a casing at the back for the elastic.
Thread the elastic through and stitch the end in place.
Pull the elastic through as tightly as you can.
Stitch the added length of elastic into a tuck.
Poke the cut end of the elastic into the front of the lining and stitch in place.
Once stitched,pull the elastic back into the casing by stretching the casing out.
Slip stitch the openings.
Another cute Chickadee(even if it is the wrong way around)
Isn't it delightful?
Thanks for popping by....
x N


I love it! Simple but still wonderfu detail to them!
ReplyDeleteLove the skirt hem detail, the blouse pleat - lovely outfit. And you make it looks so easy to make too!
ReplyDeleteGorgeous, Nicole! I love the way the prince charming print looks on the skirts.
ReplyDeleteAdorable! And +1000 on securing elastic to the clothing. I can't tell you how many times I've had to fish elastic out of a casing. I also use laughably large buttons to "hook" onto so they don't slip out.
ReplyDeleteThank you Sharon. The skirt is s quick to make but look so cute on!
ReplyDeleteThanks Deb,this would be a great stash busting pattern.
Yes Cindy,I am a fellow Prince Charming admirer,I love the coral colour way on Tildy,Thank you!
Thank you Camille,I had a nasty experience while adjusting the waist in my maternity pants,in a public lavatory!
My puffy fingers let go and it shot back into the casing!
More Clever Charlotte on the way.....I am attempting to line the Finch shorts.
x N
Great idea for the non-buttonhole-but-still-adjustable elastic! Perfect colours and prints for the girls. Looking forward to seeing your lined Finch shorts!
ReplyDeleteThank you Susanne.
ReplyDeleteFinished the shorts and working on the tute!(too short to be a tutorial)he he!
x N
Delightful indeed! Great fabric choices, too :-)
ReplyDeleteThank you Justine-Hopefully they will wear them tomorrow for Liddy's ''birthday@the beach''
ReplyDeletex N
Nicole, those are the prettiest fabric combinations! I'm not sewing much right now (and crankier for the lack) but stopping by here makes me smile! Thank you so much!!
ReplyDeleteHi, I've just found your blog through a reference from someone else. I love your tutorials, they are very thorough! I have 5 children too, including twins! Anyway, I'm now a follower.
ReplyDeleteThank you Margaret,not a lot of sewing here at the moment either!
ReplyDeleteThird week of school,two weekends in a row away and a birthday =chaos.
Thank you,as always for your lovely comments.
x N
Hi Anne and thank you,I am honoured.
I look forward to sharing adventures(sewing and other things)with you.
Will you think about a #6?
x N